It's been a while since we introduced filtering and searching when we launched Exceptionless V2.0, so we decided recently that we wanted to take the feedback we've received and do a round of improvements to it.
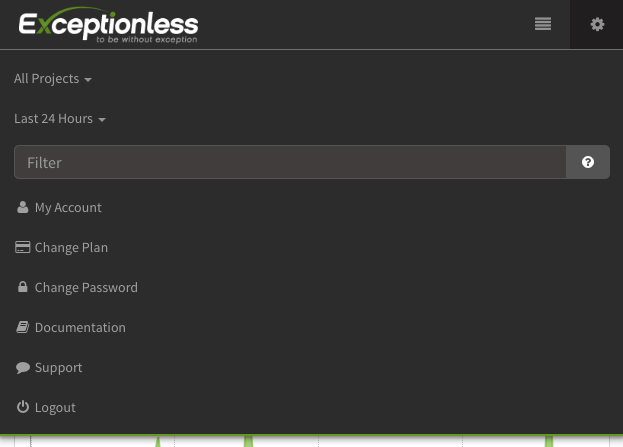
You may have already noticed the changes, but if not then the next time you log in you will see that the top bar has changed, giving you much quicker access to filtering and more upfront information.
For the primary desktop view, we removed the magnifying glass icon in the top bar and simply filled the rest the bar with the filter (search) input box. This eliminates a click to get to the filtering system, and keeps it front and center at all times.
One important note here is that if you want to show events that have been marked as fixed or hidden, you have to explicitly specify those filters, whereas previously those options were check boxes. So, you can use hidden:false or hidden:true, and fixed:true or fixed:false to view those events. Naturally, the default is false for both, showing events that have not been hidden or fixed. This means that in order to see both hidden and un-hidden events, you would need to use hidden:false OR hidden:true. Likewise, for fixed, you would need to use fixed:true OR fixed:false.
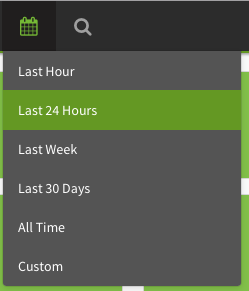
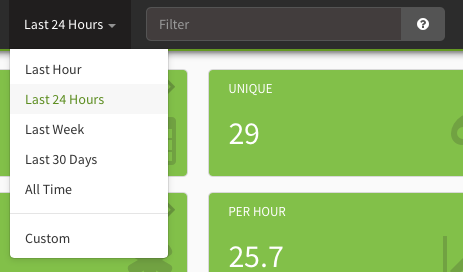
You'll notice that the date/time filter has changed as well. Instead of an icon, we now display the current time frame being viewed, once again saving you a click and keeping things in front of you.
As always, the filter still applies to the chosen time frame only.
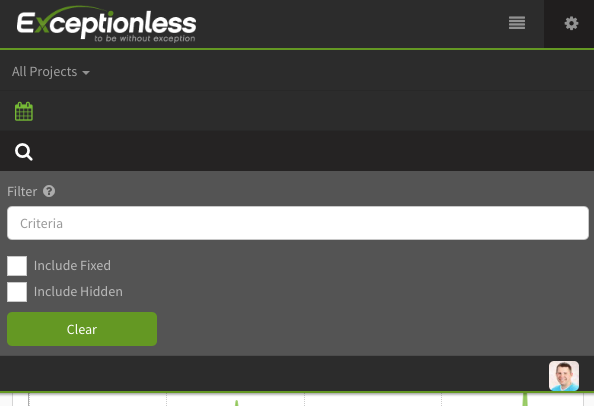
We also changed the user interface for smaller screens.
Instead of the icons at the top of the screen, the time frame selector is now a major menu item in the mobile menu and displays the current selection with the filter/search field directly below it.
This setup should allow users to filter and find the events they seek much quicker on mobile.
We think it's a pretty nice improvement. We got feedback from several users and think making everything visible at the top level of the user interface is an important change that saves time and keeps you informed.
If you've got any additional feedback, please don't hesitate to let us know. We are always looking for ways to improve, and we use Exceptionless every day too, so we are always interested in saving ourselves time and making things easier on our end!
We’ve learned a lot about simple app deployment since we first started Exceptionless. We initially went with what everyone else was doing (Octopus Deploy), but over time we thought we could greatly simplify and automate it, letting us focus on what matters, improving the product!
Through a lot of testing and iterations of our deployment process, we think we finally nailed it.
As such, we’d like to share with the community how we use Microsoft Azure Continuous Deployment and GitHub for **awesomely simple deployments. **And, how you can too. See the details of implementing this deploy workflow later in the article, below.
When we first started Exceptionless, we deployed it as a monolithic application, meaning the server and UI were one piece, or app. We used Octopus Deploy to deploy to a single IIS machine, which involved setting up a website and server for the Octopus Deploy service and configuring build agents, on each server we deployed to, that could deploy build artifacts.
After a year or so of managing Exceptionless on colocation boxes in a Dallas data center, we realized that we didn’t want to manage hardware anymore and we could scale easier on a managed service like Azure. So, we moved to Azure, where we had to set up a VM just to manage deployments with Octopus Deploy. There were also issues that we ran into with deploying to Azure WebSitThis was annoying, since every time we wanted to do a release we had to log in and tell the system to deploy to production.
Soon, we decided to split the UI and Server apps so we could deploy and work on them independently. This also meant they could scale independently and one change to either wouldn’t cause the whole site to go down when deploying. Splitting the two helped a lot, but it added more work as we now had to manage two Octopus Deploy projects. So, we started looking at the Continuous Deployment in Azure.
We researched further and found out that if we used Git Flow as a development workflow, we could ditch Octopus Deploy completely, remove that dependency, and just use Git push to manage our deployments.
With Git Flow, you do all your work in feature branches and the master branch is always stable. This allows us to set up GitHub deployment on the master and deploy to Azure automatically, with no work required! So anytime we push to the GitHub master branch, it automatically deploys to production on Azure. That simple!
Here is the BASIC workflow:
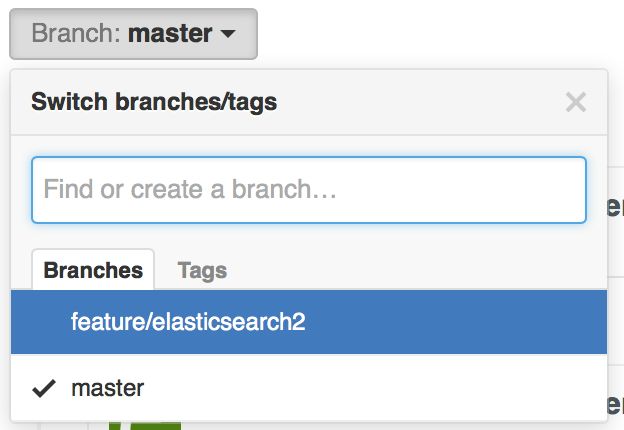
We create a new feature branch, then work on that branch until it is completed and tested. Testing is done on the website that is currently pointed to the feature branch, which is separate from production.
When we commit to any branch, our continuous integration (CI) server picks up the changes via a GitHub webhook, pulls them down, then builds the project.
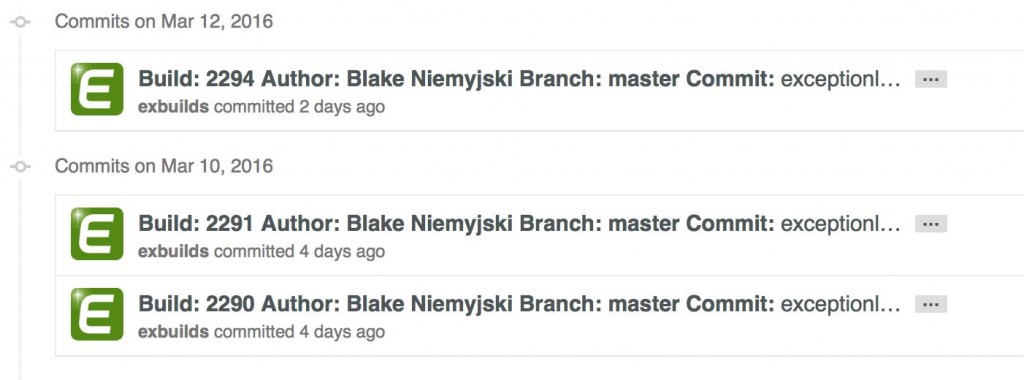
We then take all of the build artifacts and push them to a second GitHub repository using the same branch that the code was pushed to (for example, the master branch). This allows you to see exactly what artifacts change between releases (stateless too) and different branches.
Those changes are then automatically pushed via Azure Git Deploy.
Profit!
This is very slick! Since we push artifacts to the same branch they were built onto a build repository. We can then set up different environments that get auto deployed when we push to that branch. For example: When we are working on a feature, we commit to our branch. We can then set up a new website in Azure that pulls from the build server’s Git artifacts branch for that feature. This allows us to test and automate environments!
2. Store build artifacts in a separate GitHub artifacts repository. #
This works really well because you can see the entire history of your build artifacts and browse their contents. Plus, GitHub hosts it for free!
We found that we could that GitHub could understand and parse into different links. We can click on the "Commit:" part of the message to link to the actual commit that is building to see exactly has changed.
We can then click on the build to see what artifacts changed.
Another great thing about using Git to store your artifacts is that you can easily clone the artifacts to your local machine to see the exact files that are being used in a specific environment.
The artifacts repository has branches to match the branches of our code repo so we have separate build artifacts for each branch. This also means that we can just merge the feature into master when we are done and that will cause the production website that is pointed to our master repository to automatically get updated. So, it’s as simple as merge your branch to master to promote a build to production.
One issue with this approach is that the repo can get large because we are storing binary files that change on every build. We are looking into using Git Large File Support to fix this issue.
3. Automate pushing of artifacts to a secondary GitHub repository. #
For our .NET application, Exceptionless, we invoke a PowerShell script on post build to clone and commit the changes to the Git artifacts repository.
For our static Angular JavaScript app (UI), we invoke a Grunt publish task from our post build event. The publish task called into a gh-pagestask that publishes our built dist folder to the GitHub artifacts repository automatically.
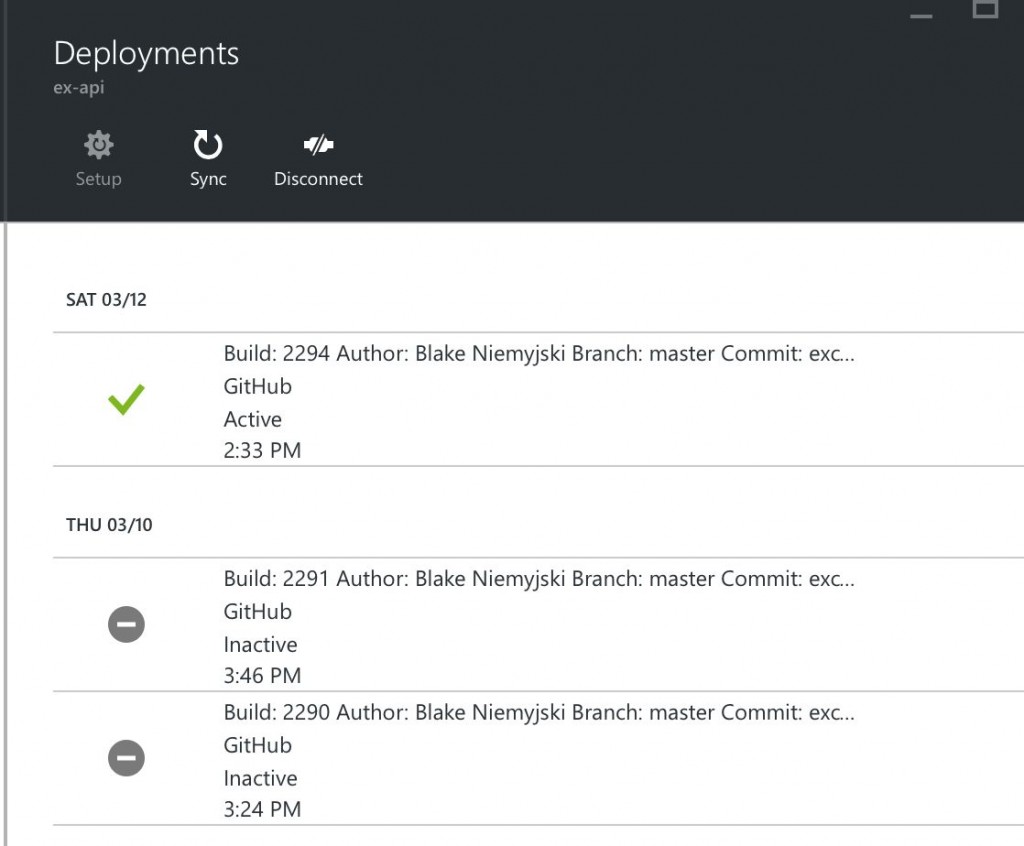
4. Point Azure Continuous Deployment to the Artifacts Repository #
It will see when new artifact commits happen and automatically deploy the changes.
Azure Continuous Deployment is another Git repository that we can easily view to see the history of deployments to each of our sites. It also allows us to easily roll back to previous versions.
5. Use Environment Variables to Override Config Settings Per Environment #
Azure Websites makes this very easy.
No production settings are stored in source control or artifacts repository.
For our ASP.NET application, our settings class will look up named settings in the following order:
environment variables
local config.json file
app settings
It will then fall back to a default value if no explicit settings are found.
Configuring our static Angular JavaScript app is a bit more work since it can't look these settings up dynamically at runtime. So instead we add some code to our deployment process.
Azure automatically runs a deploy.sh file after getting the artifacts via git deploy. It’s sole job is to run a node script that rewrites our app.config.js settings with settings defined in environment variables.
You can create multiple Azure websites (think environments) that use Continuous Deployment and point them to multiple artifact branches to support different environments!
Pro Tip: We created a http://local-app.exceptionless.io website for our spa website that’s pre-built and points to your localhost Exceptionless server. This allows us to do work on the server part without setting up or configuring a local instance of our spa app. Development made simple!
We won't lie, it took some work to get here, but the good news is you can do this really easily too. Please feel free to steal our deployment scripts and modify them for your projects. And let us know if you have questions along the way!
We get it... your morning coffee, folded towels, and how events stack (group) in your event reporting application should be controllable and customizable.
Well, thanks to a great suggestion by @adamzolotarev, now they are! Well, the events, at least.
We do our best to group your events into relevant and smartly-named stacks, but there are cases where you may want to specifically name a stack and attribute certain events to it for organization, reporting, troubleshooting, or other reasons.
To facilitate this need, we created SetManualStackingKey, which both .NET and JavaScript client users can set.
Adding your own custom stacking to events in Exceptionless is super easy. Below are examples for both .NET and JavaScript.
In these examples, we are using setManualStackingKey and naming the custom stack "MyCustomStackingKey".
So, any events you use the below for will be a part of the custom stack, and all other events, exceptiones, logs, feature usages, etc will still be stacked automatically, like normal, by the app.
try{ thrownewApplicationException("Unable to create order from quote."); }catch(Exception ex){ ex.ToExceptionless().SetManualStackingKey("MyCustomStackingKey").Submit(); }
Alternatively, you can set the stacking directly on an event (e.g., inside a plugin).
var client = exceptionless.ExceptionlessClient.default; // Node.Js // var client = require('exceptionless').ExceptionlessClient.default;
try{ thrownewError('Unable to create order from quote.'); }catch(error){ client.createException(error).setManualStackingKey('MyCustomStackingKey').submit(); }
We're always interested in what you think of Exceptionless' features and functionality, so let us know if you find custom stacking useful, need help implementing it, or just want to chat over on GitHub.
Since the last major release cycle, we've made several minor releases, including Exceptionless 3.2.1, Exceptionless.NET 3.3.5, and Exceptionless.UI 2.3.1.
Lets take a look at some of the highlights, and you can check out the full release notes on each at the provided links, below.
An issue causing query string params and cookies to be renamed when dictionary key names were being changed has been fixed.
client.Register() now respects your session setting.
Manual stacking now uses a model instead of a string, which lets us send a stack title and key value pairs telling the event how to be stacked. More info on the release page.
@ahmettaha added SubmitLog and CreateLog overloads without source parameters. Thanks!
ExceptionlessClient.Default.Configuration.UseDebugLogger() only worked in debug mode with client source, so we replaced it with ExceptionlessClient.Default.Configuration.UseInMemoryLogger()
The serializer wasn't always being passed through so it could get known event data helper methods, which was causing some silent failures - this has been fixed.
@adamzolotarev added the ability to take complete control over how an event is stacked (be careful) by adding the ability to do manual stacking by calling EventBuilder.SetManualStackingKey("MyStackingKey")
You can now ignore events by user agent bot filter when you call (ExceptionlessClient.Default.Configuration.AddUserAgentBotPatterns("*bot*")) on the client side or edit project settings server side.
The default max size limit of RequestInfo has been increased.
Extra nesting has been reduced by merging exception.Data properties into the Error.Data dictionary.
Bug Fix: AggregatedExceptiones that contain more than one inner exception are no longer discarded.
Bug Fix: Machines with a Non-English locale will not process events when SetGeo is used.
Bug Fix: ArgumentNullException will no longer be thrown if post data or cookies contain a null key.
@frankebersoll contributed by adding support for offline storage, which can be enabled by calling client.config.useLocalStorage(). Thanks!
User agent bots can be ignored via a filter now with (`client.config.addUserAgentBotPatterns("bot")) on the client side or via project settings on the server side.
@frankebersoll also added support for manual stacking (be careful! grants complete control). See release notes for instructions.
The implementation of the angular $stateChangeError has also been improved.
There's nothing major to report with the UI, just a few tweaks.
The project settings pages has been reworked by adding the ability to specify user namespaces, and user agents that the clients will ignore. @VikzSharma also fixed an issue where the single page app could be clickjacked - thanks again!
If you've got any questions about any of the release notes above, please don't hesitate to let us know by commenting below or submitting an issue to the respective GitHub repo, above.
We recently introduced reverse geocoding into Exceptionless and are now adding features to make full use of it.
What we'd like to do in this blog article is walk any interested developers through the process of adding it to their own app.
We'll talk about the resources and services we're using to pull it off, why we chose them, and give you code snippets for implementation. It's all open source, so we've also included links to all the relevant code in hopes it will make your life easier!
Wouldn’t it be nice if you could provide location services to your users automatically? Maybe help them fill in a shipping form from a zip code or there current location?
With the launch of Exceptionless 2.0 we added a geo property to all events. This allows us to translate valid latitude and longitude coordinates into a physical location. Our goal was to begin capturing the data then and enable different scenarios and uses later. This also allowed us to show end users where their customers events are being submitted from.
One of our primary goals with Exceptionless is to be completely open source and easy to use (both in setting up self hosting and using the product). We had to take this into account when picking any library or service, because we want a painless setup and no additional costs for self hosters, all while adding additional value!
Please note that if you love the services we use, you should look into using one of their paid plans or at least promoting them with a positive review, shout out, etc (everyone needs to eat at the end of the day, right?).
After researching many different services, we ended up goin
g with GeoLite2's free, offline, downloadable databases. These databases are free and updated once a month, but if you require a more accurate and up-to-date database they offer a paid subscription. We also use their open source library for interacting with the database in memory.
We use our very own Foundatio Jobs to download the most up-to-date database. Foundatio Jobs allows us to run the job in process or out of process on a schedule in Azure.
Alternatively, you could use the PowerShell script we created for downloading the database. <a href="https://github.com/exceptionless/Exceptionless/blob/master/src/Exceptionless.Core/Jobs/DownloadGeoIPDatabaseJob.cs" target="_blank">DownloadGeoIPDatabaseJob</a> downloads the database over http and extracts the file contents to disk using Foundatio Storage.
Please feel free to take a look out our job for a complete sample including logging and error handling:
var client =newHttpClient(); var file =await client.GetAsync("http://geolite.maxmind.com/download/geoip/database/GeoLite2-City.mmdb.gz", context.CancellationToken); if(!file.IsSuccessStatusCode) thrownewException("Unable to download GeoIP database.");
Looking up a Physical Address from an IP Address #
Resolving the geo coordinates into a location
After we automate the database download, the next step involves loading the database in memory using the open source library provided by MaxMind and querying by the IP address. The code below will do very basic IP validation and lookup the records using the API.
var database =awaitGetDatabaseAsync(cancellationToken); if(database ==null) returnnull;
try{ var city = database.City(ip); if(city?.Location !=null){ returnnewGeoResult{ Latitude = city.Location.Latitude, Longitude = city.Location.Longitude, Country = city.Country.IsoCode, Level1 = city.MostSpecificSubdivision.IsoCode, Locality = city.City.Name }; } }catch(Exception){ // The result was not found in the database }
if(!await _storage.ExistsAsync("GeoLite2-City.mmdb")){ Logger.Warn().Message("No GeoIP database was found.").Write(); returnnull; }
try{ using(var stream =await _storage.GetFileStreamAsync("GeoLite2-City.mmdb", cancellationToken)) _database =newDatabaseReader(stream); }catch(Exception){ // Unable to open GeoIP database. }
return _database; }
Then, just call the ResolveIPAsync method with an IP address to look up the location details.
var location =awaitResolveIPAsync("YOUR_IP_ADDRESS_HERE");
Feel free to take a look at <a href="https://github.com/exceptionless/Exceptionless/blob/master/src/Exceptionless.Insulation/Geo/MaxMindGeoIpService.cs" target="_blank">MaxMindGeoIPService</a> for a complete sample that includes logging, error handling, caching of the results, and IP validation for higher lookup throughput. We’ve spent the time writing tests and optimizing it to ensure its rock solid and works great. So feel free to grab our IGeoIPService interfaces and models and use them in your app.
It’s worth noting that in our app, we use the IP address provided in the event. This could come from a server request or the actual machine's IP address. We also fall back to the API consumer's client IP address.
Looking up a Physical Address from Geo Coordinates #
As stated previously, every event submitted to Exceptionless has a geo property that can be set. If it’s set, we will attempt to look up your location by the geo coordinates using a third party service. We used the open source Geocoding.net library, which abstracts the major different third party reverse geocode services into an easy to use API (options are always good!).
After we decided on the library, we evaluated a few API/lookup services based on cost and accuracy. We ended up going with the Google Maps GeoCoding API. They offer 2500 free requests per day and are one of the most used location services in the world.
Next, let’s write the code that will look up our location from a latitude and longitude. You can find our complete example here.
Remember to get your free api key from Google before running the code below.
publicasyncTask<GeoResult>ReverseGeocodeAsync(double latitude,double longitude,CancellationToken cancellationToken =newCancellationToken()){ var geocoder =newGoogleGeocoder("YOUR_API_KEY"); var addresses =await geocoder.ReverseGeocodeAsync(latitude, longitude, cancellationToken); var address = addresses.FirstOrDefault(); if(address ==null) returnnull;
It took us a bit of work and research initially to get everything working flawlessly for location services. We hope you grab our code off of GitHub to save yourself all that work. Also, it’s worth noting that we use Foundatio Caching to cache the results of location lookups. It drastically increased the performance and cut down on our limited number of requests to rate-limited third party services!
We also queue work items to look up the geo location since that can be an expensive operation. So, please take this into consideration anytime you are interacting with a third party service.
Get in touch on GitHub or leave a comment below to let us know your thoughts or questions. We're always open to suggestions and will do what we can to help you out if you're having issues with implementation!
Today we bring you a case study from the founder of Referral Rock and serial entrepreneur, Joshua Ho.
Referral Rock is a referral platform for small businesses that Josh created after he "... realized small businesses lacked the tools to make a customer referral program work." The app allows businesses to easily and effectively create, implement, and administer a rock-solid referral program to help grow their business.
Exceptionless recently became a part of Referral Rock's exception reporting and logging toolkit, replacing Joshua's home-grown exception logging solutions, and here are his thoughts!
"
I've always done my own exception logging. Very basic stuff, where I would just log exceptions to my local drive. This gave me a nice place to just look at errors in my ASP.NET code. As with most code, it ended up in production deployments. At one point, I even built some web pages to view the logs remotely. Those little exception logging code snippets also made it into about 3-5 other projects as the years went by. I knew there was software out there that could do this, but I more or less had it solved for myself.
**But that changed recently.**
"One huge benefit Exceptionless adds to my business is giving me the ability to provide better customer support."
As I've been growing my own SaaS business for referral software, called Referral Rock, I realized there were times my old solution wasn't effectively capturing all the exceptions and I would have to venture into the Event Log to find out what happened. Also, I liked being able to view the production server remotely, but my little web pages got lost somewhere and I wasn't excited about coding them again. Who likes to code the same thing more than once? Not I.
"I could see details on the requests, browser cookies, user identity... all much more than I could see using my old solution."
So that led me to look for other solutions to view my exceptions remotely, which is when I found Exceptionless. With the help of support, I got it up and running fairly quickly. The guys at Exceptionless were very responsive and helpful in getting me setup.
Being a startup, I was initially using the free version for about 2 weeks and was blown away. The UI was great and I love the AngularJS based responsiveness. Soon I had a great pulse on my production server. I could see details on the requests, browser cookies, user identity... all much more than I could see using my old solution. Once I had it set up, I started to see the benefits using other types of events in Exceptionless, such as logging. I started adding some logs when I was debugging an issue with a customer, and it worked great.
"With the help of support, I got it up and running fairly quickly. The guys at Exceptionless were very responsive and helpful in getting me setup."
One huge benefit Exceptionless adds to my business is giving me the ability to provide better customer support. Not only do I know when errors are happening, but also who is seeing them. This allows me to have an opportunity to reach out to that specific customer, once the issue is fixed, and say something like "I saw you had and error when you did XYZ, I wanted to let you know it is fixed now so you can try it again". Taking opportunities to provide that level of service has helped my business.
We are now running a paid version of Exceptionless with multiple projects and I look forward to adding more logs and playing with other features to give me even greater visibility into my web app. Thanks guys!
We love to see people enjoying Exceptionless - it's our baby, and we've put a lot of blood, sweat, and tears (I blame Blake) into it. Keep rocking it with Referral Rock!
To many, this feature may be the missing piece... that connection you've always wanted to make between users, bugs, exceptions, app events, etc. I'm talking about, of course, user session tracking!
That's right, you can now use Exceptionless to track users as they use your app, which of course will come in super handy when you want to know exactly what they did to stumble upon or cause an error or trigger an event.
Continue reading to learn more about sessions and how you can enable them for your apps.
First, you must have a paid (premium) Exceptionless plan to report on sessions if you are hosting with us. This is mainly because of the added resource requirements the feature puts on our infrastructure. We think it's definitely worth it, though!
Sessions can be searched/filtered like all other events - they are just an event type like exceptions or logs.
Each user session records how long they were active and what they did. For instance, the average user session on be.exceptionless.io the first week we monitored it using the feature was two hours.
With that, each user session event has a "Session Events" tab that displays all the relevant events that occurred during that session and allows you to see exactly what that user did. This is especially helpful, of course, if that session lead to an exception or noteworthy event in your app.
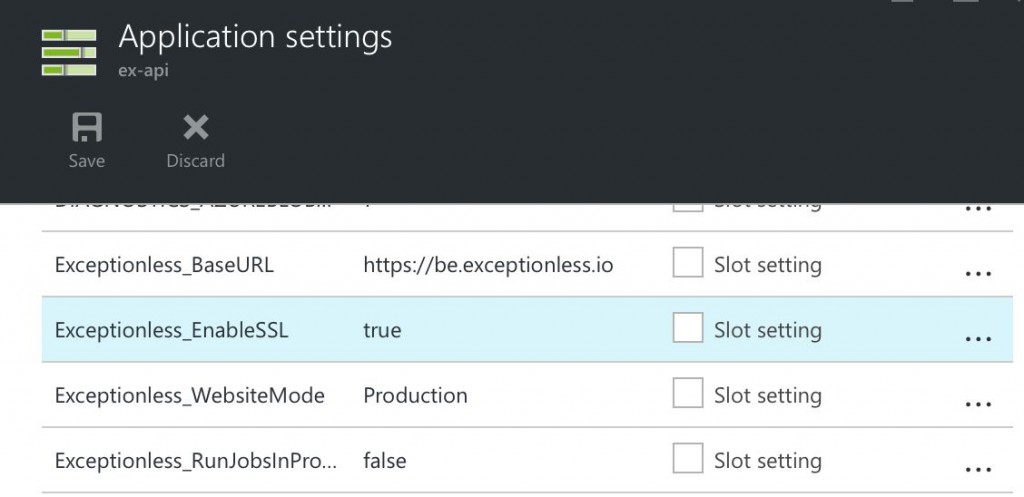
First, you'll need to update to the latest client versions to enable sessions, then you'll have to follow the below steps to begin tracking them. Once you've got that set up, visit the new Sessions section under the Reports option on your main dashboard, or navigate directly to https://be.exceptionless.io/session/dashboard. If you are self hosting, make sure you update to Exceptionless 3.2 first.
For Exceptionless to track a user for your app, you need to send a user identity with each event. To do so, you need to set the default user identity via the following client methods:
Once the user is set on the config object, it will be applied to all future events.
Please Note: In WinForms and WPF applications, a plugin will automatically set the default user to the **Environment.UserName** if the default user hasn't been already set. Likewise, if you are in a web environment, we will set the default user to the request principal's identity if the default user hasn't already been set.
If you are using WinForms, WPF, or a Browser App, you can enable sessions by calling the EnableSessions extension method.
Sessions are created in two different ways. Either the client can send a session start event, or we can create it automatically on the server side when an event is processed.
We have a server-side plugin that runs as part of our pipeline process for every event - its sole purpose is to manage sessions by using a hash on the user's identity as a lookup for the session id.
If the session doesnt' exist or the current event is a session event type, a new session id will be created. If we receive a sessionend event, we close that session and update the end time on the sessionstart event.
We also have a CloseInactiveSessionsJob event that runs every few minutes to close sessions that haven't been updated in a set period of time. This allows you to efficiently show who is online and offline during a time window.
How do I Enable Near Real-Time Online/Offline Then? #
We do this by default in our JavaScript, WinForms, and WPF clients when you call the UseSessions() method.
In the background, we send a heartbeat event every 30 seconds if no other events have been sent in the last 30 seconds.
You can disable this heartbeat from being sent by passing false as an argument to the UseSessions() method.
The WinForms and WPF clients will also send a SessionEnd event when the process exits.
Can I Manually Send SessionStart, SessionEnd, and heartbeat Events? #
Sure! You can send these events manually via our client API to start, update, or end a session. Please remember, though, that a user identity must be set.
As always, please send us your feedback. You can post it here in the comments or submit a GitHub Issue and we will get back to you as soon as possible! We're always looking for contributors, as well, so don't be afraid to jump in and be the hero the code needs. Contributors get Exceptionless perks!
That's right folks - we've gone and released Exceptionless 3.2, which includes releases for Exceptionless.NET, Exceptionless.JavaScript, and Exceptionless.UI! Awe yeah.
We're kind of excited, in case you couldn't tell. Big stuff in here, like session tracking (#BOOM), licensing changes (less confusion - it's a good thing), and posting via HTTP GET (such easy, much wow)!
Track and automatically manage user sessions for much more visibility into their user experience, how they interact with your app, and, of course, any errors or events that occur related to that user. This answers the age-old question, "What the hell was this guy doing when stuff blew up!?"
Now it's even easier to integrate with Exceptionless from any environment, because you can post event or meta data via HTTP GET! More info coming soon (blog post).
The server and all Exceptionless projects are now using the Apache License, so there should be much less confusion on how things are licensed moving forward. Boring stuff, we know... but important.
User locations are now resolved from geographic coordinates or the IP address. We look at the geo property for coordinates or an IP, then we inspect the IP. If no IP or geo coordinates present themsevles, we fall back to the client IP that the event was submitted from.
As always, we keep speed improvements in mind with each release. With 3.2, we've been able to make more massive improvements in processing time for events (over 250% per 1000 events!) and further reduce app startup times and elastic query execution times. #alwaysoptimizing!
The hourly event-throttling threshold has been increased from 5x to 10x the plan limit. The way we calculate it is by taking the plan limit and dividing it by the hours in the month, then multiplying it by 10.
User experience was the primary focus of this UI release, along with the new sessions feature. More details below, including other improvements and a few bug fix details.
When adding a new project, users will now have a much better experience, and we added a JavaScript configuration section for JS projects. Check it out!
Besides integrating with the above, the only major change in the JavaScript client, like the .NET client, was that users can now op-in to sessions. To do so, set a default user and call the below:
In the case study, we discuss how Elasticsearch let us improve our real-time dashboard, work with time zones more easily, index data much faster, not have to worry so much about pre-aggregating data, maintain much less code, improve backup and restoration, shrink disk space usage, and, perhaps most importantly, drastically improve scalability.
Basically, we really like Elasticsearch and you should check it out if you haven't already.
This week we want to talk about reference Ids and how we use them to improve customer service for Exceptionless. And how we think you can do the same for your users.
A reference id is a unique identifier, generated by the user, that allows you to look up a submitted event at a later time. This is important because event Ids are not created until after the event is processed, so there is no other way to look up an event. We also use Reference Ids to help deduplicate events server side, which is another reason why it’s important that they are unique.
One of the ways we use Reference Ids is to support end users, something that is very important to us. There is nothing more frustrating than being unable to help a user that is experiencing a problem because you don’t know what they are seeing (when there could be thousands of errors in your app).
To combat this issue, we always try to include a reference Id with every error message shown to the user. This allows end users to contact us with a Reference Id and receive help immediately for the error they are seeing because we can easily track down and view it.
The Exceptionless clients have built in support to generate and track unique Reference Ids for every error event. Behind the scenes, we register a default Reference Id plugin that sets a Reference Id on submitted error events and stores the Reference Id in an implementation of ILastReferenceIdManager. The Reference Id manager’s goal is just to persist and retrieve the last used Reference Id.
Since this is a default plugin, we can enable this behavior by calling the UseReferenceIds() method on the configuration object to register the default Reference Id on every error event.
Please note that you can create your own plugin to create your very own Reference Id(s).
To get the the last used Reference Id, you can call the GetLastReferenceId() helper method on the the ExceptionlessClient instance.
C#
usingExceptionless; // Get the last created Reference Id ExceptionlessClient.Default.GetLastReferenceId();
JavaScript
// Get the last created Reference Id
exceptionless.ExceptionlessClient.default.getLastReferenceId();
You might have noticed how easy it is to get or add Reference Id’s to your events automatically. This makes it a breeze to let your developers track down user-facing issues by displaying the Reference Id to your end users.
We display Reference Ids to all of our end users anytime an error occurs in our ASP.NET WebAPI application. We accomplish this by adding a custom <a href="http://www.asp.net/web-api/overview/error-handling/web-api-global-error-handling" target="_blank">IExceptionHandler</a> and return a new error response to include the Reference Id as shown below:
var exceptionContext = context.ExceptionContext; var request = exceptionContext.Request; if(request ==null) thrownewArgumentException($"{typeof(ExceptionContext).Name}.{"Request"} must not be null",nameof(context));
// CreateErrorResponse should never fail, even if there is no configuration associated with the request // In that case, use the default HttpConfiguration to con-neg the response media type if(configuration ==null){ using(HttpConfiguration defaultConfig =newHttpConfiguration()){ return request.CreateResponse(statusCode, error, defaultConfig); } }
You might be thinking: "Reference Ids are great, but what do I do with them now that I have one." Well, you can view the event that they reference on our site or via our API. This can be accomplished two different ways:
Hotlinking: You can link directly to a submitted event by outputting a link in your UI or logs (e.g. https://be.exceptionless.io/event/by-ref/YOUR_REFERENCE_ID)
Search: You can search via our api/ui with reference:YOUR_REFERENCE_ID
We hope this article was helpful, and we'd love to know if you're using Reference Ids and how they've helped you help users, solve internal issues, etc. Post a comment below!
 It's been a while since we introduced filtering and searching when we launched Exceptionless V2.0, so we decided recently that we wanted to take the feedback we've received and do a round of improvements to it.
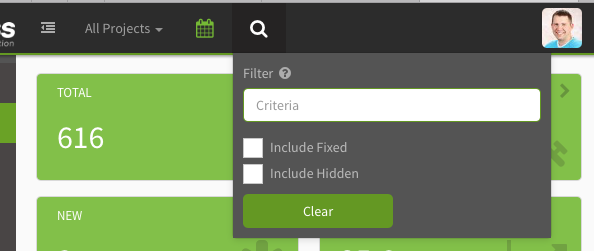


 Sometimes you just need things to be your way.


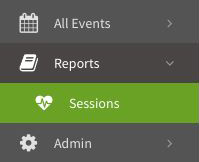 First, you'll need to update to the latest client versions to enable sessions, then you'll have to follow the below steps to begin tracking them. Once you've got that set up, visit the new Sessions section under the Reports option on your main dashboard, or navigate directly to https://be.exceptionless.io/session/dashboard. If you are self hosting, make sure you
  That's right folks - we've gone and released Exceptionless 3.2, which includes releases for Exceptionless.NET, Exceptionless.JavaScript, and Exceptionless.UI! Awe yeah.
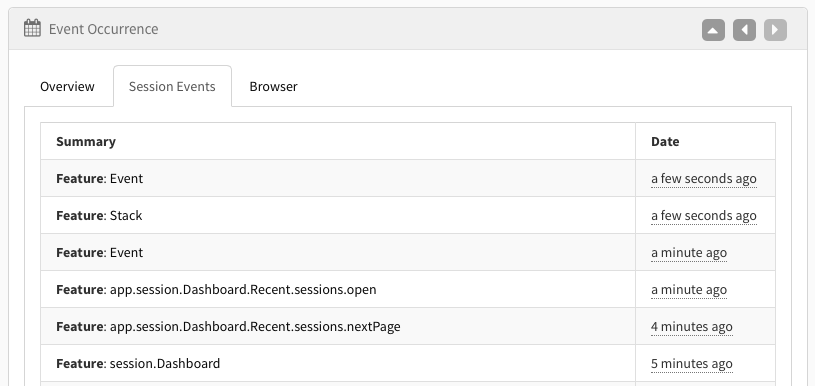
](/assets/img/news/sessions-event-tab-user-footsteps.jpg)
](/assets/img/news/sessions-unique-user-data.jpg)